


How to Use Prototype Stencils
Low-volume manual printing. Ideal for prototypes
When prototyping dictates fast action, with minimal cost, Prototype Stencils are the best solution. A Prototype Stencil gives you quality in a stencil and framework designed for quick printing right on your desk. If you want to test out an idea and need an inexpensive stencil to quickly apply solder paste and print your board, you can do so quickly and easily with a prototype stencil from Advanced Circuits.
- Eliminate the registration difficulty associated in hand printing with a flat piece of metal
- Eliminate printer set up for short run prototypes
- Allow quick alignment for repeatability
- Save money over full size stencils designed for automated printers<
- Squeegee included
Simply tape the L shaped alignment border to your work surface. Slide the board into the corner. Align the stencil over the board and tape to the alignment border. You are ready to print. When finished, lift the stencil and remove the board. Slide the next board into the same corner and print again!
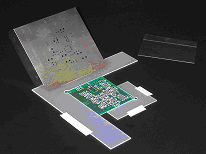
The stencil is formed on 3 sides to create a rigid tool. The 3 sides also double as a handle to lift the stencil, while keeping the stencil rigid during the separation of stencil and paste.
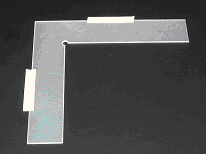
| 1. Example of Prototype stencil as you will receive it. | 2. Place the large L-shaped board fixture on a flat surface and tape it down to prevent it from moving. |
 |
 |
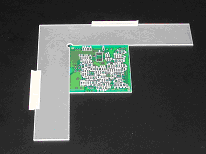
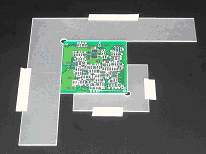
| 3. Place the PCB into the L-shaped fixture. | 4. Place the small L-shaped board fixture in the diagonal corner and tape it down to prevent it from moving. |
 |
 |
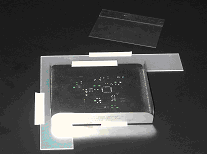
| 5. Align the stencil over the SMT pads and tape the flat edge to the large L-shaped board fixture. Apply solder paste and print. | 6. Lift the stencil, remove board, and insert new board. Lower stencil and begin printing. |
 |
 |
